How to Annotate a Video: Step-by-Step Guide for Beginners
Quick Answer
Learn how to annotate a video with this detailed guide, perfect for beginners in the Philippines. Turn your videos into interactive experiences easily!
Table of Contents
With the growing number of internet users in the Philippines, currently at 67.26% of the population in 2024 according to the World Bank, video content is more accessible than ever. Annotating videos can enhance viewer engagement and make your content more interactive and informative. Whether you're a budding content creator or an educator, learning how to annotate videos effectively can set your work apart. Let's dive into how you can start annotating your videos today.
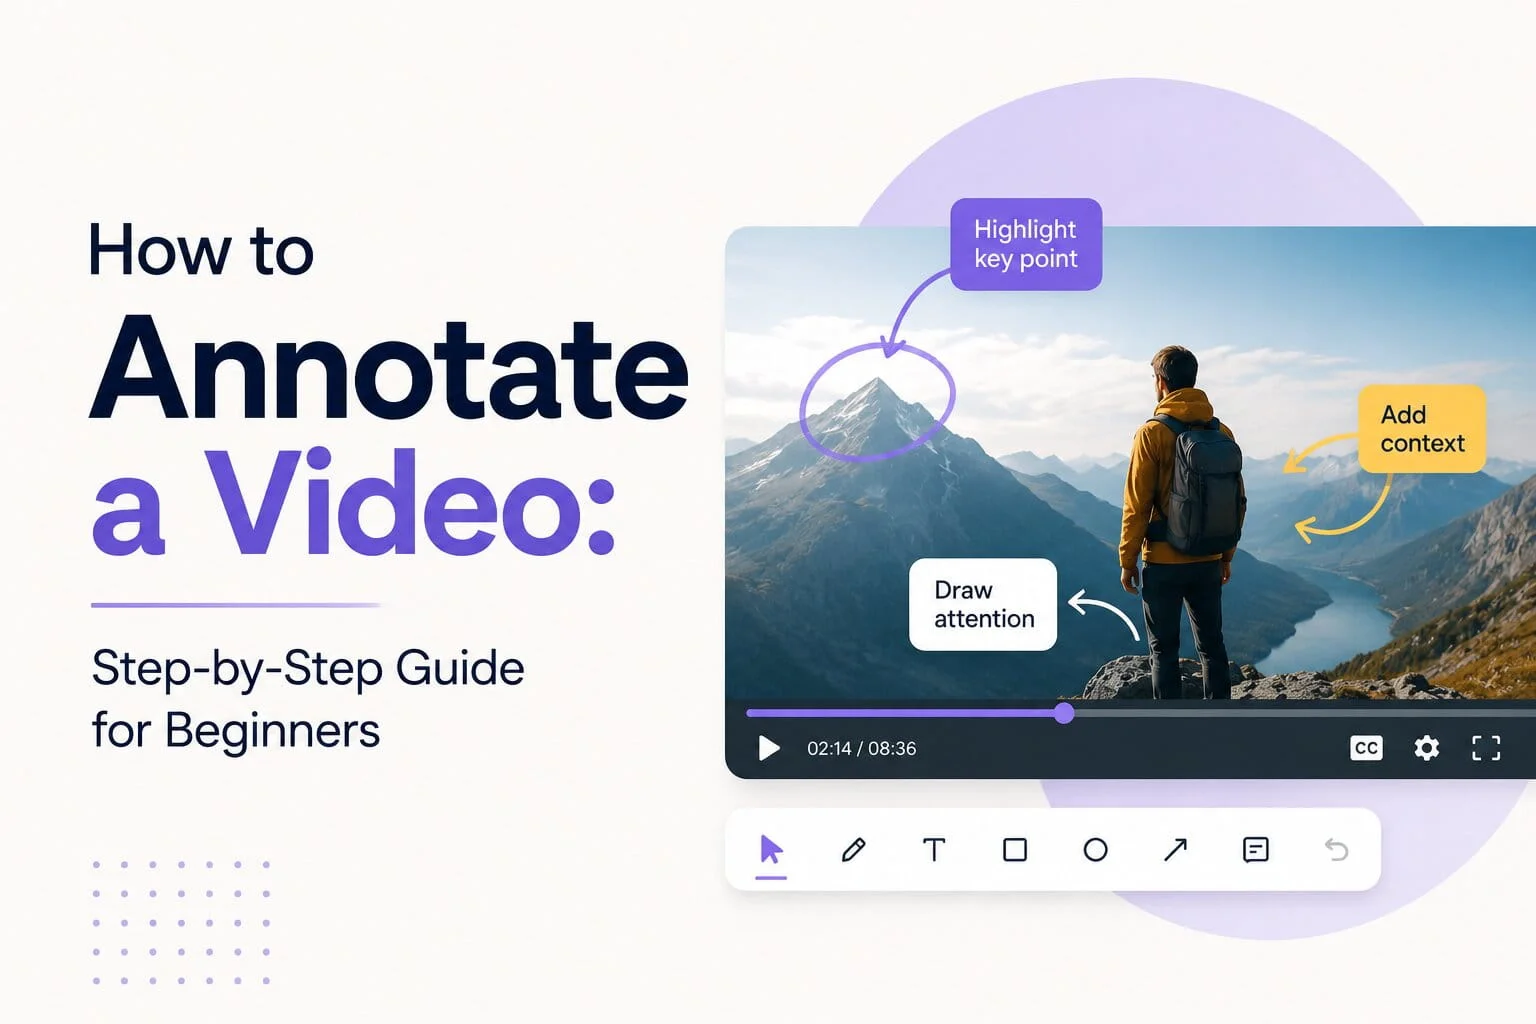
Annotating a video involves adding text, shapes, and other visual elements to highlight specific parts of the video. Whether you're creating educational content, marketing videos, or simply sharing personal stories, annotations can make the message clearer and more engaging. This process can transform a simple video into an interactive experience that captivates your audience and provides additional context or information.
Table of Contents
- Choose the Right Tools for Video Annotation
- Import Your Video
- Add Annotations to Enhance Your Video
- Export and Share Your Annotated Video
- Annotated Videos in the Philippines: Market Insights
- Common Mistakes When Annotating Videos
- Frequently Asked Questions
Choose the Right Tools for Video Annotation
Start by selecting a video annotation tool that fits your needs. There are several options available, ranging from simple online editors to more advanced software. Popular choices include Adobe Premiere Pro, Camtasia, and free tools like Kapwing and VEED.IO. Each of these tools has its own strengths. For instance, Adobe Premiere Pro offers a comprehensive suite of editing tools that are perfect for professionals, while Kapwing provides a more user-friendly interface suitable for beginners.
When choosing a tool, consider the features you need, such as text overlays, shapes, or interactive elements. The right tool should align with your specific project needs and skill level. Additionally, check if the tool is compatible with your operating system—this can prevent technical hiccups along the way. You might also want to explore community feedback and tutorials available online to better understand the tool’s capabilities and limitations.
Another consideration is the cost. While some tools offer free versions, they may have limitations on features or export quality. If you're working on professional projects, investing in a paid version might be worthwhile. Conversely, if you're just starting, free tools can provide the basic functionalities you need without a financial commitment.
Import Your Video
Once you've chosen your tool, the next step is to import the video you want to annotate. Most tools allow you to upload directly from your computer or import from cloud storage services. This step is crucial as it sets the foundation for your entire editing process. Ensure your video is in a compatible format, such as MP4 or MOV, for smooth editing. Different tools support different formats, so double-check this before beginning your project.
Handling large video files can be challenging, especially if your internet connection is unstable. In the Philippines, where internet usage is high, having a reliable connection is key to avoiding interruptions during uploads or downloads. If you're working on lengthy videos, consider breaking them into smaller segments to make the upload process more manageable.
Additionally, take the time to organize your video files. Create folders for your projects and label them clearly. This organization will help streamline your workflow and ensure you can easily locate files when needed. It’s a simple step that can save you a lot of headaches later on.
Add Annotations to Enhance Your Video
Now comes the creative part. Use your chosen tool to add annotations like text boxes, arrows, or shapes to emphasize key points in your video. Annotations should be used strategically to guide your audience's attention and enhance the storytelling or informational aspect of your video. For instance, if you're creating a tutorial, annotations can highlight important steps or instructions.
Consider using different colors and sizes to draw attention to specific areas. Colors can be a powerful tool in setting the mood or theme of your video. For educational videos, you might include definitions or additional information that appears as the video plays—this can be particularly helpful in complex topics where visual reinforcement enhances understanding.
Experiment with timing to ensure annotations appear and disappear at the right moments. This involves synchronizing your annotations with the video's audio and visual cues to maximize their impact. Preview your video multiple times to refine the timing and ensure that annotations contribute positively to the viewer's experience.
Export and Share Your Annotated Video
After finalizing your annotations, it's time to export your video. Choose the right resolution and format for your intended platform, whether it's YouTube, social media, or a personal website. Exporting may take some time, especially for higher resolution videos, so be patient and ensure your computer has the necessary resources to handle this task.
When exporting, pay attention to the quality settings. You want to strike a balance between file size and video quality, particularly if you're uploading to platforms with file size restrictions. Most tools provide preset options for various platforms, simplifying the process for you.
Once your video is exported, consider where you'll share it. Platforms like YouTube or Facebook offer wide audiences, but niche platforms might be more suitable depending on your content. Sharing your video effectively involves understanding your audience and choosing the right platform to reach them. Don't forget to write compelling descriptions and use relevant tags to enhance discoverability.
Annotated Videos in the Philippines: Market Insights
With a GDP per capita of $3,984.83 in 2024 and an unemployment rate of 2.24% in 2025, the Philippines presents a vibrant market for video content. As the total labor force is projected at 52,204,133 in 2025, there's immense potential for content creators to reach a wide audience with annotated videos. This method not only makes content more informative but also accessible and engaging, appealing to the tech-savvy Filipino audience.
Video content creators in the Philippines can leverage these annotations to cater to a diverse and growing online audience. As more Filipinos gain access to the internet, thanks to the country's expanding internet infrastructure, the demand for engaging video content is likely to increase. Annotations can help creators meet this demand by making videos more interactive and informative, thus keeping viewers engaged longer.
Moreover, educational institutions in the Philippines are increasingly adopting digital tools for teaching. Annotated videos can play a crucial role in this shift, offering students a more dynamic learning experience. By integrating annotations, educators can break down complex topics into digestible segments, making learning more effective and enjoyable.
Source: World Bank Open Data
Common Mistakes When Annotating Videos
While annotating videos, many creators make the mistake of overloading their videos with text and graphics. This can overwhelm viewers and detract from the main message. It's crucial to strike a balance and ensure that annotations are used to enhance, not clutter, the content. Simplicity often works best, especially when trying to convey a clear message.
Another common error is poor timing, where annotations appear too quickly or stay on screen for too long. Always preview your work to ensure that annotations enhance rather than hinder the viewing experience. Proper timing can help in maintaining the viewer's attention and ensuring the information is retained.
Lastly, failing to test the video on different devices can lead to issues. Annotations might look great on a computer screen but could appear differently on a smartphone or tablet. Always test your videos across various devices to ensure they look and function as intended, providing a consistent experience for all viewers.
Frequently Asked Questions
What software is best for beginners to annotate videos?
Beginners might find user-friendly tools like Kapwing or VEED.IO helpful because they offer simple interfaces and essential features without overwhelming complexity. These tools provide a great starting point for anyone new to video editing and annotation.
Can I annotate videos on my smartphone?
Yes, several apps allow video annotation on smartphones, such as InShot and Canva. They offer mobile-friendly features to add text and graphics conveniently, making it easy to annotate videos on the go.
How can annotations improve educational videos?
Annotations can highlight key points, provide definitions, and offer additional context, making educational videos more interactive and engaging for learners. This can enhance understanding and retention of information, particularly in complex subjects.
Are there any free tools for annotating videos?
Yes, tools like Kapwing and VEED.IO offer free plans with basic video annotation features suitable for most simple projects. These free tools can be a good starting point for beginners or for those on a budget.
What formats should I export my annotated video in?
Common formats like MP4 and MOV are widely supported and recommended for most platforms due to their compatibility and quality balance. Choosing the right format ensures your video is viewable on a variety of devices and platforms.
Latest Virtual Assistant Jobs
Fresh remote VA roles — apply directly